WhatsApp Guide
How to link a WhatsApp number, create a WhatsApp agent, and launch WhatsApp campaigns from the platform.
Written By Product
Last updated 4 months ago
Before You Begin — What You'll Need
If a number hasn’t been verified by Meta yet, you can still link and use it: it will appear with a yellow “Unverified” badge, but the technical activation (“Register”) will still work.
Part 1 — Connecting a WhatsApp Number
Where: Dashboard → Integrazioni → WhatsApp Business (path: /dashboard/integrations/whatsapp).
Connection process (recommended: log in with Meta)
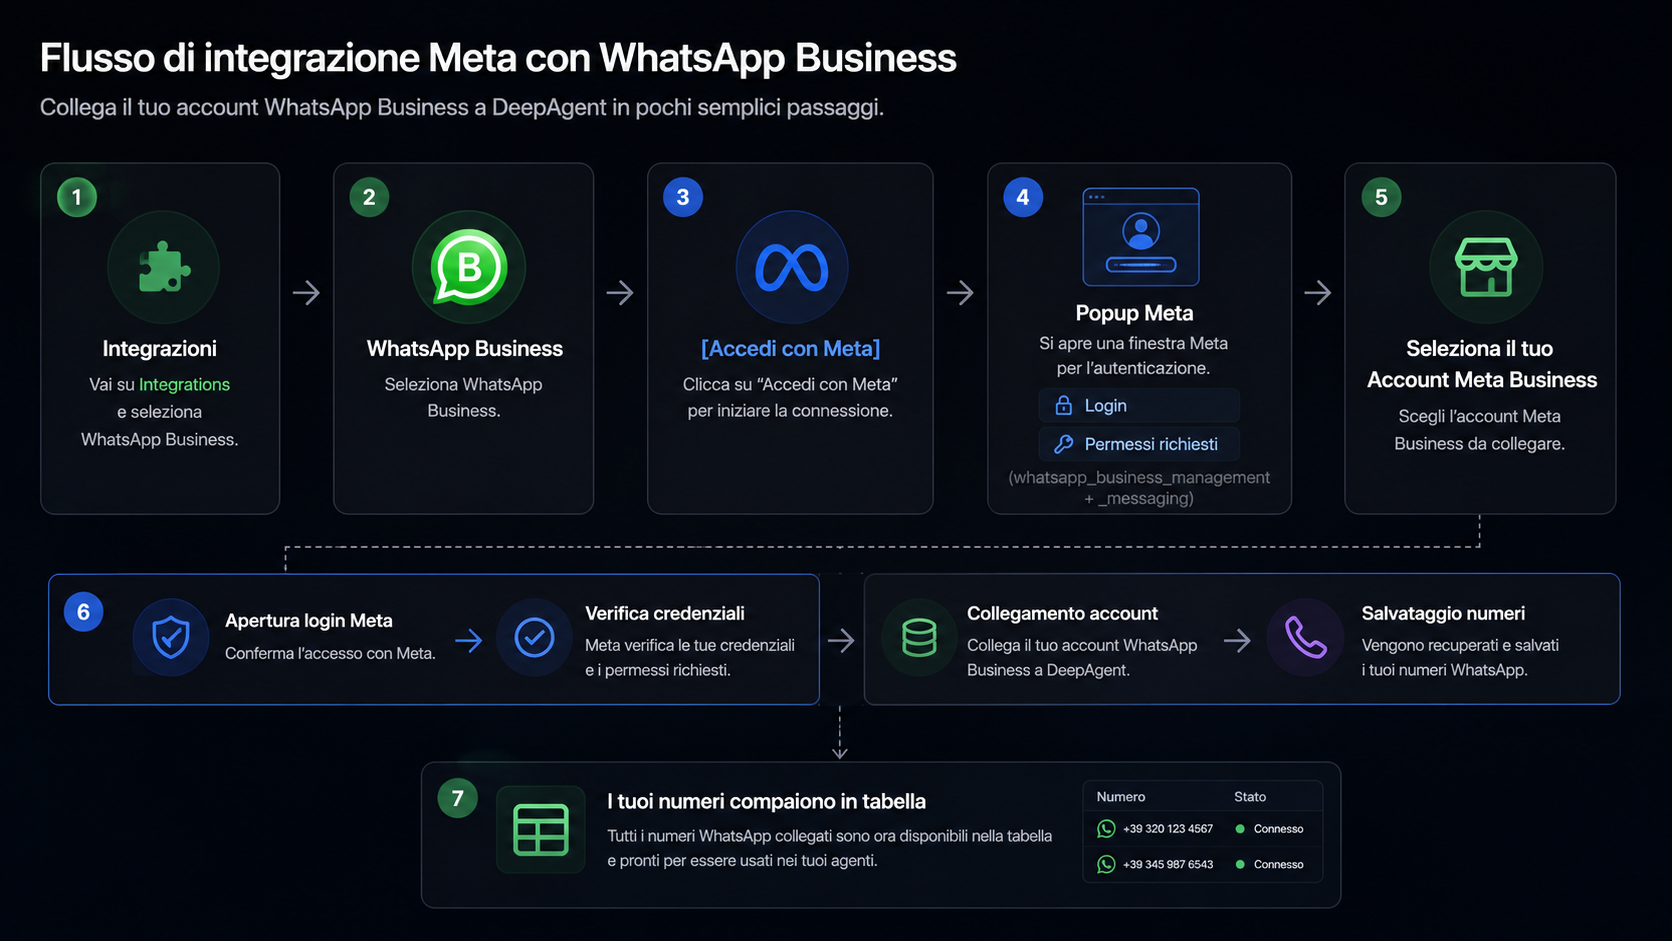
Open Integrations → WhatsApp Business. If you haven’t linked anything yet, you’ll see the following message: “No accounts connected — Connect your Meta profile to view WhatsApp Business numbers.”
Click "Log in with Meta." The Meta login popup will open.
Grant the requested permissions (manage and send WhatsApp messages) and, if you have multiple accounts, select the correct Meta Business account.
The platform automatically completes the connection steps and saves the numbers it finds. Once finished, you’ll see the account details page with the list of numbers.
Security note: After logging in, the access token remains on the server side; it is never displayed in the interface.
The number table
Each linked number displays:
"Register" activates the number on the WhatsApp Cloud API (tooltip: "Activate the number on the WhatsApp Cloud API"). The platform attempts automatic registration when you open the page; if necessary, you can restart the process manually using this button.
If Meta has two-factor authentication (2FA) enabled, the "Two-Factor Authentication PIN" window will appear after clicking "Register": enter the 6-digit PIN configured in Meta Business Manager and confirm by clicking "Register."
Verified ≠ Registered. Verified = Meta has confirmed the number’s identity. Registered/Live = the number is active on the Cloud API (“Register” button). These are two separate processes.
Manual Connection (Advanced)
If you prefer not to use the Meta login (e.g., BSP setup / System User), from the ⋯ menu → “Edit Token,” you can manually enter: Name, Access Token, Phone Number ID, WABA ID, and API version. This is the method for those who manage tokens manually.
Manage the Linked Account
"Templates" (at the top of the account tab; appears when there is at least one number): Opens the management of Meta-approved WhatsApp templates (required for starting conversations and for campaigns).
"Disconnect": Removes the Meta account and all its numbers. This action cannot be undone and requires confirmation.
⋯ → "Remove Number": Deletes a single number. This also requires confirmation.
Part 2 — Creating a WhatsApp Agent
A WhatsApp agent is the AI assistant that responds in chat, follows your workflows, and can perform actions (book an appointment, assign to an agent, tag the contact…).
One agent = one channel. A WhatsApp agent handles only WhatsApp. To cover multiple channels (e.g., voice + WhatsApp), create multiple agents and orchestrate them—not a single multichannel agent.
Go to: Dashboard → Agent Builder → the channel selection screen opens → select the “WhatsApp” card → enter the builder (/dashboard/agent-builder/whatsapp/new).
The builder’s structure: 5 tabs
The builder is organized into tabs. At the top, you’ll find the agent name (editable), the “Active” badge (if applicable), and the “Save” and “Go live” buttons. On the right is a summary panel with a 🔴/🟢 dot for each section: red = a required field is missing, green = complete.
1. Identity
Agent name (required to go live) — e.g., “WA Customer Support.”
Description (optional, internal note).
Languages: Primary language (required) + any additional languages.
Conversation style: response length (Short/Balanced/Detailed), emoji use (None/Light/Many), formatting (Plain text/Structured), “one question at a time.”
2. Instructions
Here you define how the agent thinks and speaks. Two modes:
Guided (default): fillable sections — Identity and Role, Context, Goal, Edge Cases, Guardrails, Thread Behavior (read recent messages, summarize long threads, avoid repeated questions, wait for grouped messages).
Advanced: free-form prompt editor (type or paste text).
Start with a template (optional): ready-made templates (Lead Qualification, Customer Support, Appointment Booking, FAQ) that pre-fill the sections.
Knowledge Base: Upload documents, URLs, and FAQs that agents can reference when responding.
3. Actions
Tools agents can use during a chat:
Schedule an appointment (calendar integration).
Custom tools (calls to your REST APIs).
Conversation history (record of interactions via voice and WhatsApp).
Predefined actions (CRM): Assign to agent, Add tag, Close conversation, Update contact — each with its own configuration (when triggered, what to say to the customer…).
Data collection (optional): fields the agent must collect.
4. Flow
The flow is the conversation path, displayed on a node-based canvas (visual canvas).
You can have multiple flows per agent; one is set as the default.
Add a flow from scratch or start with a template (Booking, Lead Qualification, Support/FAQ, Follow-up).
Main node types: Entry (start), Opener (opening message template for outbound flows), Step (messages), Branch (“if the user responds with X → go to…” conditions), Terminals (Handoff / End of conversation).
For each step: message text (supports
{{variabile}}), up to 3 quick replies (buttons, max ~20 characters each), and secondary actions (tags, tool call, jump to step, handoff).The Issues panel flags invalid flows (unreachable steps, missing/unapproved templates) and takes you directly to the node that needs correction.
5. Operations
Response buffer: how long the agent waits before responding (batches messages).
Online status: “Typing…” indicator and read receipts.
Agent hours: time slots when a human agent is available; outside those hours, the AI responds.
Outside agent hours: no response, or a template or text message is sent.
Publish the agent (Go live)
Fill in at least: Name, Primary Language, Instructions, and select a WhatsApp number. (If anything is missing, the button will notify you: e.g., “Select a WhatsApp number to go live.”)
Click “Go live” in the top right corner. The agent is saved, configured, and activated: the status changes from “Draft” to “Active,” and you’re taken to the agent’s details page.
From there, you can test it, view conversations, and check analytics. To edit it, return to the builder: saved changes will update the live agent.
If you exit with unsaved changes, the app will prompt you: Cancel / Exit without saving / Save and exit.
Part 3: Creating a WhatsApp Campaign
A campaign sends a template message to many contacts at once (mass outreach).
Where: Dashboard → Campagne → "Nuova Campagna" (path: /dashboard/campaigns/new).
You need a WhatsApp plan. If your workspace doesn’t have an active WhatsApp plan, the panel will display “WhatsApp add-on required” and you won’t be able to send messages. You also need permission to create campaigns in the workspace.
Layout: form on the left, summary on the right
All on one screen: on the left, the configuration sections (from top to bottom); on the right, a Summary that’s always visible with the final button.
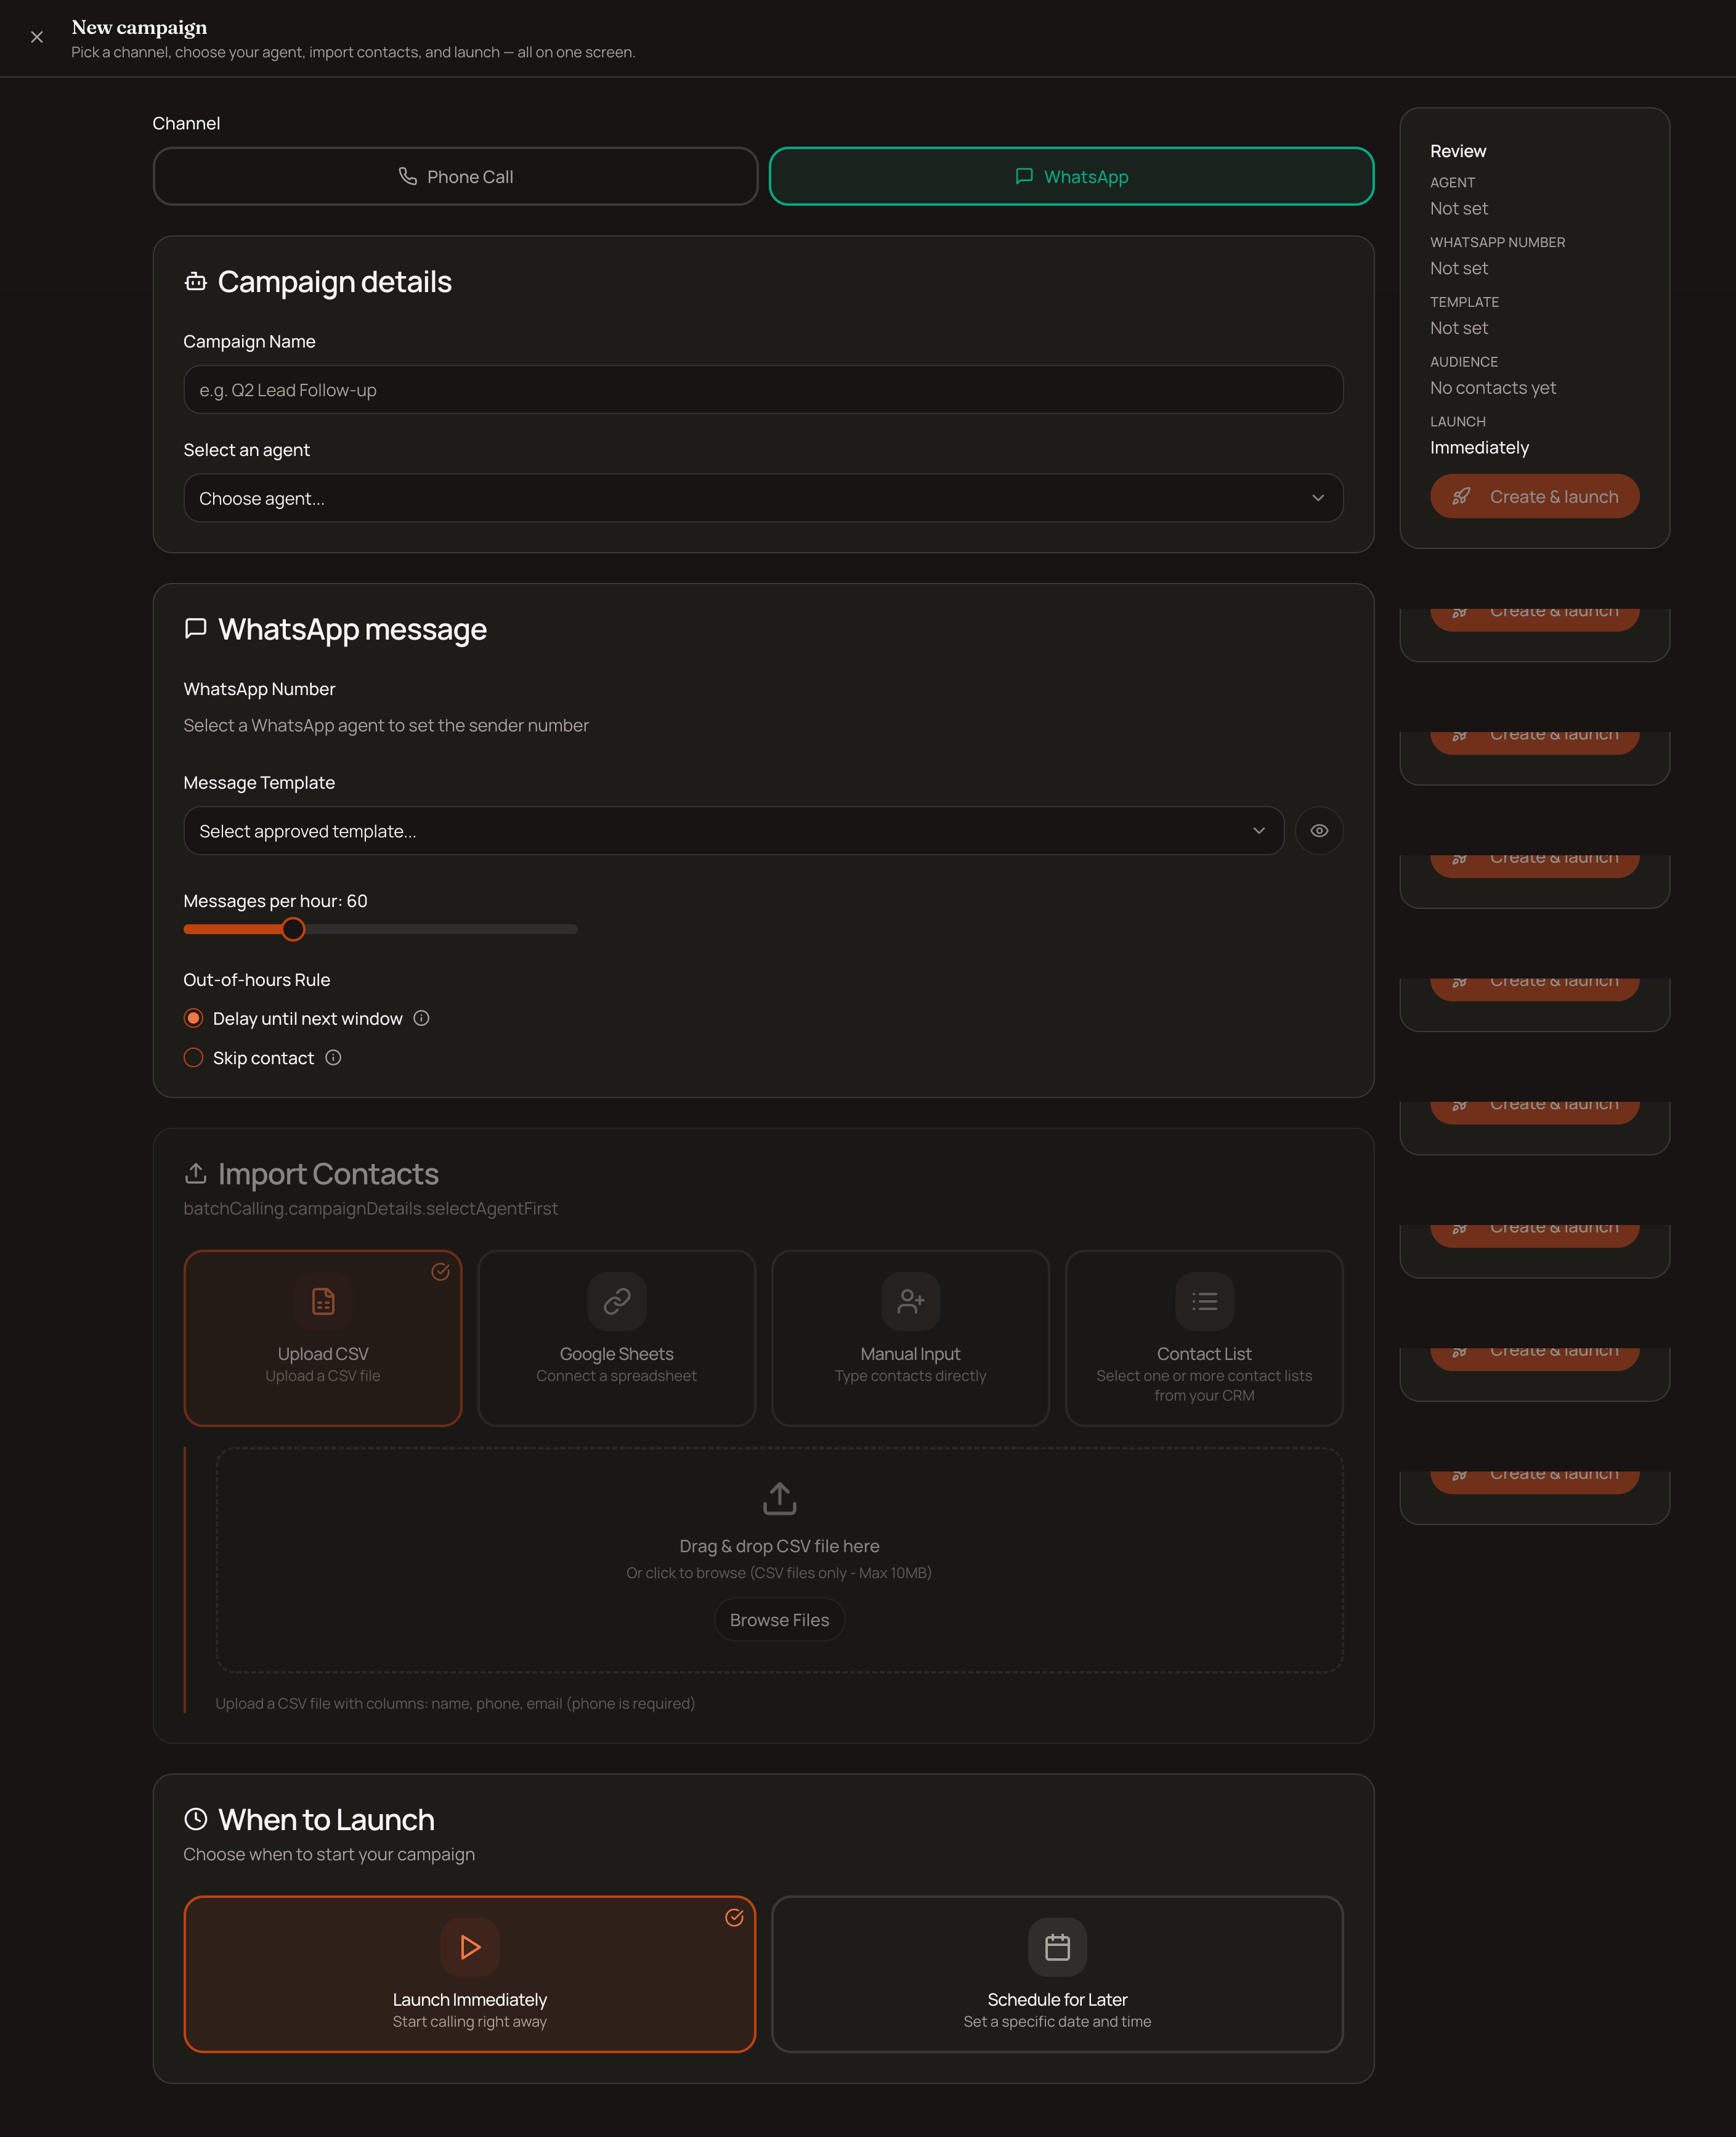
Steps
Channel: Click “WhatsApp” (“Send WhatsApp messages with templates at scale”). The WhatsApp card appears only if WhatsApp is enabled in the workspace.
Campaign details:
Campaign Name (e.g., “Q2 Lead Follow-up”).
Select an agent: The list shows only WhatsApp agents (with active agents listed first). The selected agent determines the sender’s number.
WhatsApp Message:
WhatsApp Number (sender): automatically set by the agent; cannot be edited. If the agent isn’t linked to a number, the app will notify you.
Message Template: Choose from the number’s approved templates (
Nome (lingua)format). The 👁 button opens a preview on a phone mockup.Template Variables (if the template has any): For each
{{variabile}}, choose the source—Static Value (fixed text that’s the same for everyone) or Contact Field (column from the audience, e.g.,first_name). Example:{{firstName}}→ fieldfirst_name,{{sconto}}→ static value20%.Messages per hour: slider 10–200 (default 60) for the sending rate.
Out-of-hours rule: Delay to the next window (contacts outside business hours are queued and sent when the system reopens) or Skip contact (they are not contacted).
Import contacts (active after selecting an agent). Four methods:
Upload CSV (max 10MB): drag & drop, then map the columns to the contact fields.
Google Sheets: Connect your account, select a sheet and range, then map the columns.
Manual entry: row-by-row table (phone number required + name/email/variables).
Contact list (if CRM is enabled): Select a saved list.
When to launch: Immediately or Schedule (select a future date and time).
Summary (on the right): Check the agent, number, template, audience, and launch time.
Launch: “Create and Launch” (send immediately) or “Schedule Campaign” (scheduled send).
After launch: results
You’ll be redirected to the Campaign Center (/dashboard/campaigns); open the campaign to view details.
Delivery: Sent → Delivered → Read → Replied funnel with corresponding percentages, plus Opt-out and Failed counters and start/end dates.
Audience: searchable table of recipients with status (Pending/Sent/Delivered/Read/Failed), filters, and CSV export.
Current Limits (Important to Know)
No automatic retries for WhatsApp campaigns (unlike calls).
All recipients receive the same template; personalization is based solely on variables (static value or contact field).
Summary of the three paths
Was this helpful?
Still need help? Share an idea